


Photo by Shannon Potter on Unsplash
Most modern applications require users to verify their identity. The process of validating one’s identity is known as authentication. A username or userID is a unique identifier and a preset password are used to authenticate a user.
Developers/organizations need to be extra careful when dealing with authentication and user details both for the benefit of the user’s privacy and the company’s integrity.
While there are various ways of authentication, the most widely used methods are social logins and custom logins.
The former is easy on the end-user but is a tedious task when it comes to implementing. It requires generating an API auth token, adding the web app domain to ACL, and installing relevant dependencies on the application. But, using custom login gives you fine-grain control over the visuals, accessibility, localization, and amount of information collected. Custom logins can also be tweaked to use 2FA.
Before we proceed, we must familiarize ourselves with a key difference between authentication and authorization.
Authentication v/s Authorization
Simply put, authentication is the process of verifying if a user is actually who he/she claims to be. Let’s say there are two users A and B. If A is trying to claim that they are user B, they need to provide a username and password unique to user B and by intuition, there’s no way they would know the credentials of user B unless it was stolen/ or hacked.
Authorization, on the other hand, is the privilege/access provided to the user to perform different actions in the application. An authenticated user need not be authorized to perform all the possible actions. For example, you can’t delete tweets from another user, you’re authorized only to create/delete your own tweets.
Integrating Authentication Using Frontegg
In this article, we’ll be implementing a custom login minus all the complications. “How?”, you ask. The answer is Frontegg: a free user management platform that can handle authentication, authorization, SSO, social logins, and everything related to user management on behalf of your application. It is the one-stop solution that allows you to focus more time on building and shipping great features.
In this article, we’ll be integrating a custom login system using Frontegg’s login box builder.
So let’s get started: The login/sign-up widget is currently available for React, Angular, and Vue-based applications. This article focuses on integrating the authentication system in React. However, a similar strategy can be used in other frameworks to achieve the same results.
Quickly head to frontegg.com and create a free account, which should take barely a minute or two.
Creating an authentication system is simple and just takes three steps: design, integrate, and deploy.
Design
After you sign up, you’ll land on a page that says ‘Build your login box’, ‘Integrate it into your app’, and so on. Click on the ‘Start‘ button corresponding to the ‘Build your login box’ option.
You can choose various types of authentication methods here. It can be one or more, depending on what suits your needs. There is enough flexibility to choose between different types of authentication, e.g password-based, passwordless, etc. Additionally, you can also integrate social logins. To make custom adjustments and additions click on ‘configure’. Next comes styling. Head to the tab named ‘ style‘ beside ‘Login methods’.
To help you make progress faster with the designs, there’s a live preview pane on the right side that shows what your login/signup box will look like. Take your time in choosing the colors/theme that align with your overall application/organization theme. Once you’re happy with it, click on ‘Publish Changes’ to save the changes.

Integrate
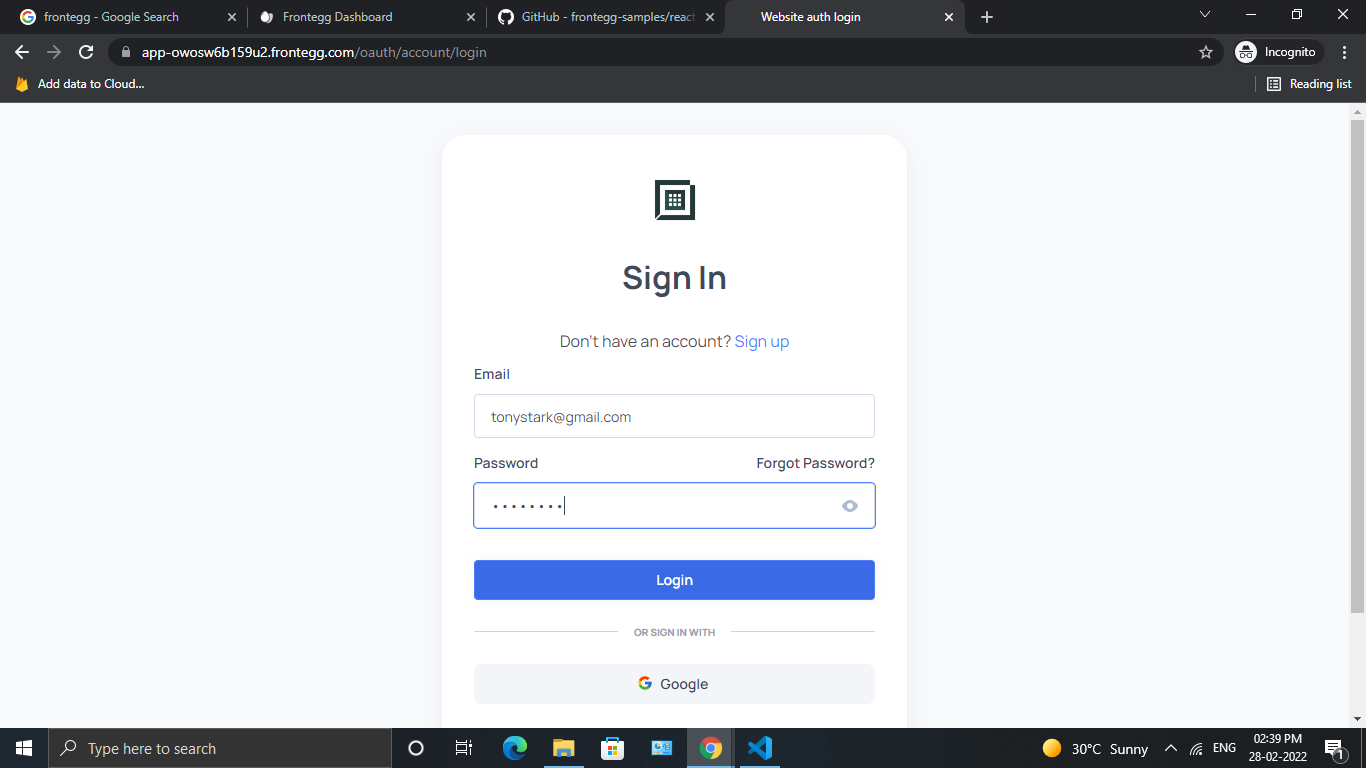
The next task is to install the widget into your website. It could either be embedded or hosted, and we’ll be going ahead with the latter. However, you’re free to choose anything that comforts you.
Install react-router-dom and @frontegg/react by running the following command:
npm install @frontegg/react react-router-dom@latest
In your index.js, wrap the root component with the FrontEgg component. This basically is a HOC that prohibits users from accessing private routes when unauthorized.
import ReactDOM from 'react-dom';

import App from './App';

import './index.css';

import { FronteggProvider } from '@frontegg/react';

const contextOptions = {

baseUrl: 'https://YOURBASEURL.frontegg.com',

clientId: 'YOURCLiENTID''

};

ReactDOM.render(

<FronteggProvider contextOptions={contextOptions} hostedLoginBox={true}>

<App />,

document.getElementById('root')

);
The base URL is unique to each user. In order to get yours, click on the ‘Go live’ option and add your domain to the ‘Allowed Origin‘ after which you can see your base URL. To obtain your client ID, click on your profile present in the bottom-left corner and then click on workspace settings in the expanded menu.
To build the auth logic to check if a user is authenticated or not, we can use the useAuth custom hook. This hook returns the user details (if authenticated) and auth state (true or false). So based on these returned values, relevant components/information can be rendered.
const {user, isAuthenticated} = useAuth()
Below is a sample snippet demonstrating the same:
import './App.css';

import { useEffect } from "react";

import {

useAuth,

useLoginWithRedirect

} from "@frontegg/react";

import {ContextHolder} from "@frontegg/rest-api";

function App() {

const { user, isAuthenticated } = useAuth();

const loginWithRedirect = useLoginWithRedirect();

console.log('user - ', user);

console.log('isAuthenticated - ', isAuthenticated);

console.log('user - ', user);

useEffect(() => {

if (!isAuthenticated) {

console.log('user is not logged-on. going to loginWithRedirect')

loginWithRedirect();

}

}, [isAuthenticated, loginWithRedirect]);

const logout = () => {

const baseUrl = ContextHolder.getContext().baseUrl;

window.location.href = ${baseUrl}/oauth/logout?post_logout_redirect_uri=${window.location};

};

return (

< /div className = "App">

{isAuthenticated ? (

< /div >

< div >

</img src="{user?.profilePictureUrl}" alt="{user?.name}" />

< /div >

< div >

< span >Logged in as: {user?.name}< /span >

< /div >

< div >

< button onClick= {() =>logout()}>Click to logout< button >

< /div >

< /div >

) : (

< div >

< button onClick={loginWithRedirect}>Click me to login < /button >

< /div >

)}

< /div >

);

}

export default App
In the above snippet, the useEffect hook redirects the user to the sign-in page if they are not authenticated. You may as well show an error message and ask the user to manually navigate to the sign-in page, but it is generally a good practice to redirect.
If you’re using a class-based component, you can use the equivalent of the useEffect hook, like componentDidMount and componentDidUpdate.
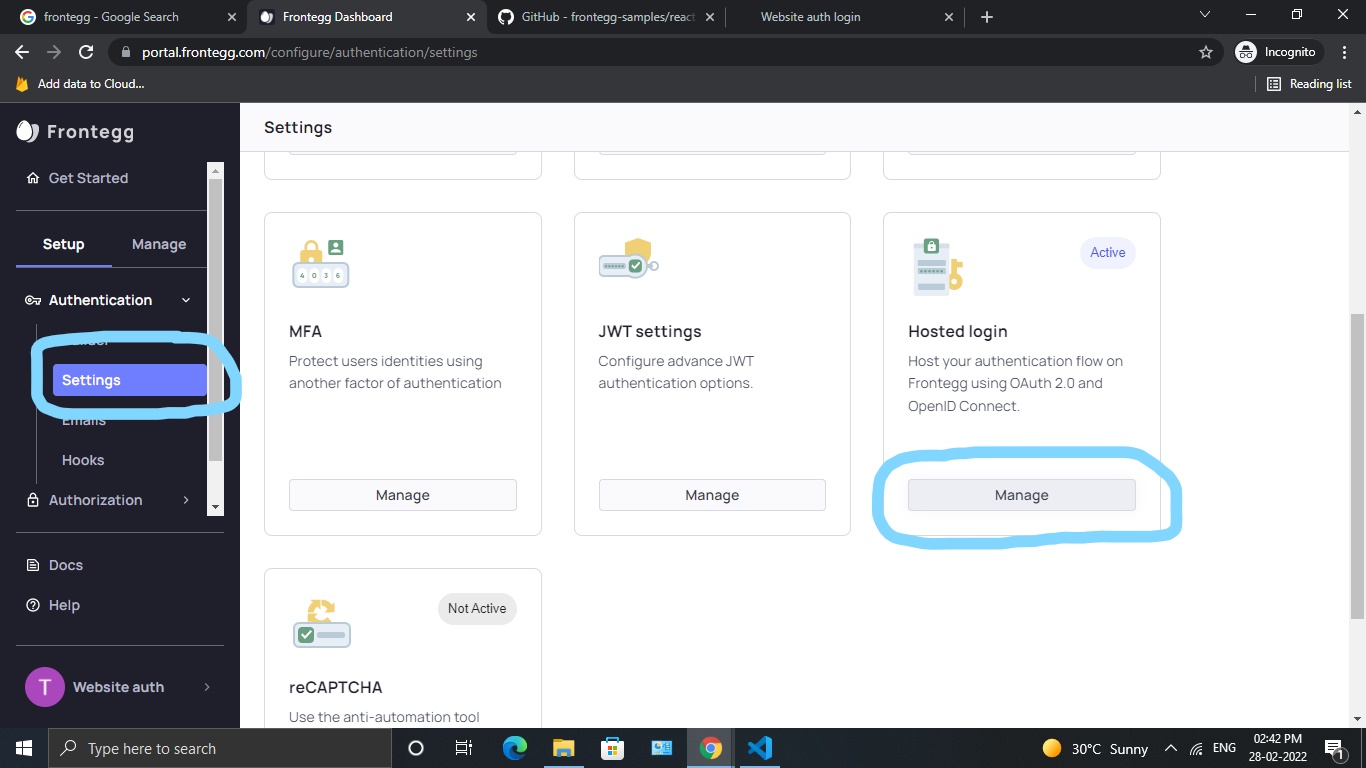
Next, enable the hosted login from your dashboard. Select, “settings” under authentication and click on “Manage for Hosted Login”. Below is an image showing the same:
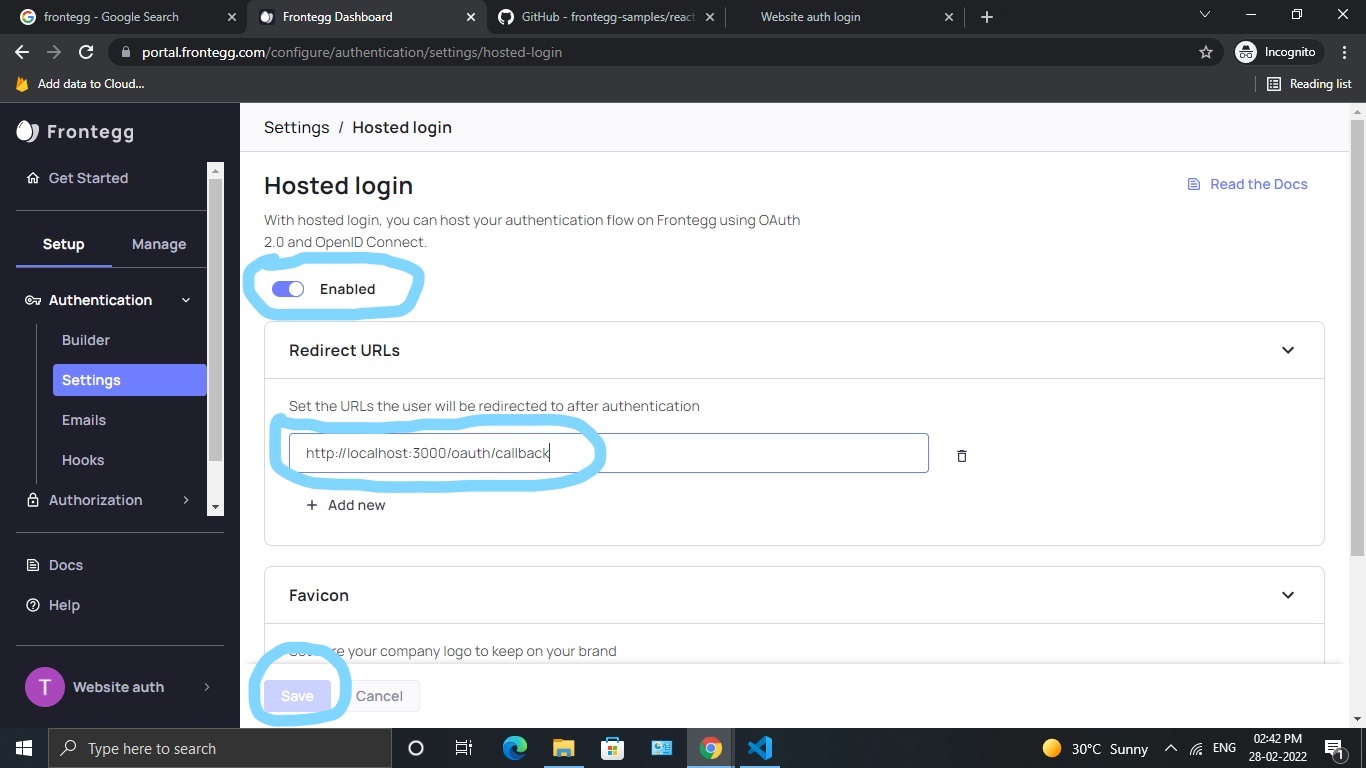
Next, you’ve to toggle “enable switch” to enable the hosted login functionality and add http://localhost:3000/oauth/callback in the redirected URL input field (given that you are running on localhost).
After making the above-mentioned additions/changes, click on “save” at the bottom.
Deploy
Since we’ve followed along with the hosted login method, this login box is hosted elsewhere but can be rendered in your application by referring to the hosted origin. This link is already configured in the contextOptions object, so the only thing left to do is whitelist the domain of your application.
If you’ve used embedded login, you can skip this step.
Click on “Go live” in the top tab and click on “Add your domain” in the populated options. Under the “Domains” section, scroll to the bottom to whitelist your domain in the “Allowed Origins” section. This should prepare the widget to go live.

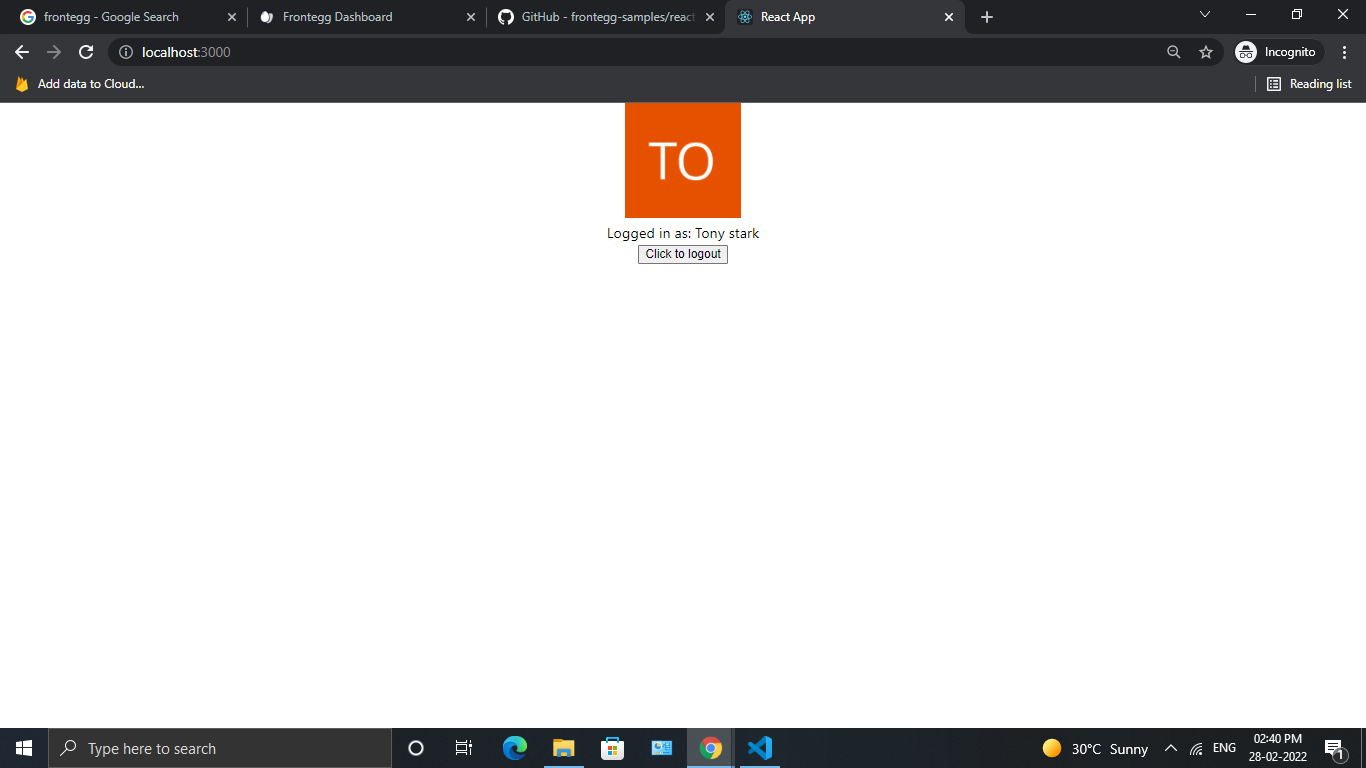
And that is it! We have successfully implemented a fully working authentication widget in almost no time without compromising on design or security.
Conclusion
At the end of the day, authentication is a sensitive task and should be implemented with the best measures and practices to be foolproof in all possible scenarios.
And looking at the ease of implementation above, one could surely rely on Frontegg for user management as it is not just an authentication widget but does much more. In brief, it is a complete end-to-end solution for user management.